After 18 months of procrastinating about updating the blog about the Ultralite I figure its time to start putting pen to paper (or fingers to keyboard). Regular followers of the blog may remember that my Buttonwillow adventure ended with the Ultralite being flatbedded home as it looked like on of the two bolts holding the diff in place had backed out and gas tank prevented me from doing a roadside fix. I was thus still quite happy on the truck ride home as I thought it would be an easy fix and I should be back on the road soon – little did I know that I was in for some “diff”icult times.
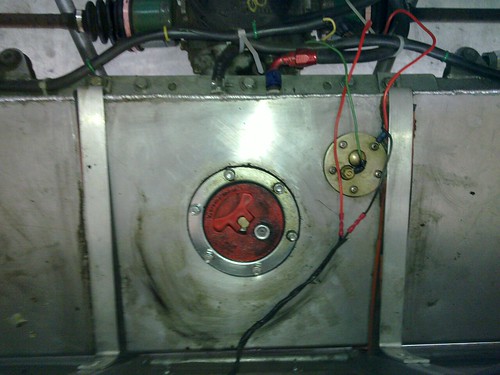
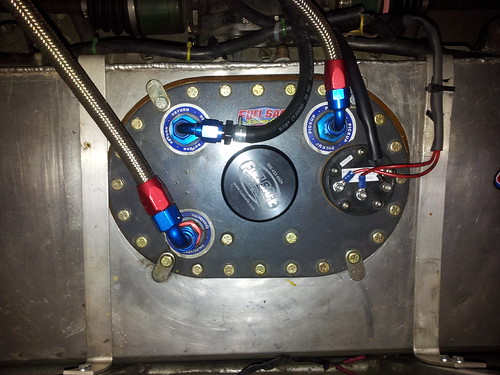
The first thing to do was to empty the fuel tank and then remove it. As you might see from the residue above, the gas cap had been weeping fuel for a while and I figured that this was a good time to replace the gasket around the filler and see if that would fix the problem. I stuck my hand into the empty tank to see what size spanner I would need to remove the nuts on the cap fitting when I was shocked to discover that the cap ring was attached using just sheet metal screws with no nuts or backing plate inside the tank. While I could probably have fixed the issue fairly easily, I figured I had ridden my luck hard enough by tracking such a shoddy fuel setup and decided to go with a proper fuel cell instead. I gave Fuel Safe a call and they were able to create a custom bladder that fit inside my existing tank. Not only was the new custom cell much safer than the original setup but it has a proper racing collector which meant that I could ditch my external surge tank setup and save some weight. If you are looking for a custom fuel cell I highly recommend Drew Barney at Fuel Safe who was the guy I dealt with to create the setup below.
While my tank was at a Fuel Safe, I got busy actually fixing the diff mounts. Removing the gas tank had shown that the bolt had not backed out and instead had snapped from the torque. After removing the bolt and drilling out the snapped section in the unit I found that both rear bolts were metric grade 8.8 which sounds fine but actually equates to SAE grade 5 which is not what you want for something load bearing like this. I swapped both the bolts with metric 10.9 grade (equiv SAE grade 8) hardware and refitted the fuel cell thinking I should be good to go. However as soon as I backed out of the garage I heard the clunk from the drive train which meant that things were still not ok.

Pulling the center console off the shifter area showed the second problem (above). The front mounting point was created by welding a single mount onto a cut down version of the differential member assembly from a Subaru legacy. This mount was attached to some very thin metal and had basically ripped itself loose from the member assembly. After speaking to other Ultralite owner I found that this was a common failure point and needed to be reinforced for track cars in particular. I thus had a thick steel plate welded to the existing assembly to moth create a new mount point and also spread the load more widely on the Subaru part (see below).

Talking to the other owner also brought out that the diff bolts breaking was a common occurance and that many owners had created a brace that attached to the frame and helped spread the engine torque loads beyond the two diff bolts. Rob at Dietschwerks created this brace for me that had been on my car for over a year now and has been through several track days with no issues.

If you are an Ultralite owner I recommend that you check that you diff bolts are metric 10.9 grade and also create a diff brace for your car to avoid the painful debugging process that I went through.
One reply on ““Diff”icult times”
[…] Fuel Safe fuel cell […]